 The writing life is full of editors. If you’re going to have a successful writing career, you’re going to work with a variety of editors. Editors work for large traditional publishing houses as well as small presses. Their work is required to format your book and prepare your manuscript for publication.
If you going to go in a different direction and self-publish or establish your own small press, it’s equally important to have a trusted editor working with you and your team. In fact, a good editor will make or break a book. In order to have any success as a self-published or hybrid author, you must engage a great editor to format your book.
The job of an editor is done behind-the-scenes and often seems thankless (their name isn’t on the book, after all), yet their work is absolutely essential to your success. There are some simple ways that you can smooth the path for your working relationship with an editor.
Editors like to work with professionals. Literary agents feel the same way.
One of the most important ways you can prove your professionalism to both agents and editors is by ensuring you format your book correctly when you send in your manuscript.
Note that I’m listing the basics of proper manuscript formatting here. However, some publishers have alternative formatting requirements. For example, instead of unadorned, 12-point Times New Roman, some publishers want a different font for first submissions. I know of at least one magazine which still requires all submissions in old-school Courier font. So read the instructions carefully before you send in a manuscript!
10 steps to the perfect book format
In the United States in 2020, here’s generally what’s expected in terms of a formatted manuscript ready for submission to an agent and an editor.
1. Deliver your manuscript as a Microsoft Word file
The publishing industry has standardized on Microsoft Word as the default way to exchange manuscripts, edit manuscripts, and finalize edits with authors.
Once you send in your manuscript, and it is accepted for representation or publication, then editors will be commenting and editing through the “Track Changes” function in Word.
- What kind of Word File? You might have realized that Microsoft Word can output either a .doc or a .docx file. Either of these two files will work, and you can use either one. Just please, don’t send in a .pdf file or a .txt file. Those are not acceptable formats for submission.
- What If You Don’t Have Word? If you don’t have access to a full-featured copy of Microsoft Office, never fear. You can use Google Docs or Apple Pages or Scrivener. All of these systems easily allow an “export” of your file to Microsoft Word. However, before you send in your manuscript, double-check that the formatting requirements are met.
- Single File Submissions: Note that all manuscript submissions to an agent or editor should be in one file. Don’t send your chapters as separate files or the sections of your book as separate files. Just put it all in one document for delivery.
2. Use Times New Roman,12-point, in black
The Template
Times New Roman is the standard font used for manuscripts now.
Do not yield to the temptation to use a more EXCITING font because it fits your prose style better. Your manuscript will look professional with your words at the same size, in the same font as every other manuscript, and in the basic black color expected of ink.
Note that bold-face should almost never be used in a submitted manuscript, except perhaps for chapter headings and section headings (and usually not for those either). Italics are typically only used in a book manuscript for internal dialogue, translated text or other intra-book necessary emphasis.
Later Font Choices
Books are submitted in Times New Roman, but are published using a variety of fonts.
The final layout and font selection is part of the book layout and publishing process, which takes place months after submission. The editor and publishing house often work closely with the author to finalize the book layout, but their layout work has nothing to do with the original font used for submission.
3. Use a standard page size of 8.5×11 inches. Set margins to 1 inch.
Most new documents in Microsoft Word default to these basic parameters. So if you’re using Microsoft Word out of the box, you should be set up for success.
However, if you have changed your margins or modified these settings, it’s good to check your settings. Here’s how you do that:
- Page Size: To set page size in Word, use File > Page Setup and find Page Size in the drop-down menu.
- Margins: To set margins in Word, use Format > Document.
If you are exporting to Word from another program such as Vellum, Scrivener or Apple Pages, it’s also good to re-check the resulting file to make sure that the margins and page sizes are right.
4. Double-space your lines of text
Text in a manuscript is never single-spaced.
Instead, it is always double spaced.
- Note: if you’ve already written your book with different line spacing, select all of your text in Word, click Format > Paragraph, then select “Double” in the drop-down box under “Line spacing.”
5. Indent paragraphs by .5 inches.
Paragraphs should begin with a half inch indentation.
However, it is important to note that this indention should be put in place through the indentation setting in Word, not by hitting the tab bar until you get to the right place, and certainly not by hitting “space, space, space.”
- How to Set Indentation: all of your text in Word, then set indentation using Format > Paragraph. Under “Indentation” and by “Left,” type .5. under “Special,” then choose “First line” from the drop-down menu.
6. Use left-justified for your text alignment
The text in your book should not be justified or left-aligned or centered.
Instead, make all the text in your book left-justified, and leave the right side nonuniform (unjustified).
- Note: To set alignment in Word, select all text, then click the left justification icon in the Home tab or select Format > Paragraph and choose “Left” in the Alignment drop-down box.
7. Paragraphs should be formatted appropriately
Different genres have slightly different formatting standards for paragraph breaks.
Novelists and other fiction writers should always use indented paragraphs without paragraph breaks.
Nonfiction writers may use no indentation as long as paragraphs are separated by a full paragraph break.
- Note: You can find what the standards are in your genre by looking at a book in that genre. Make sure it was published in the last five years, to accommodate all recent publishing conventions.
8. Page Breaks
Use page breaks.
When you reach the end of a chapter, instead of just hitting return to get to the next page and the next chapter, use the page break function.
If you don’t use the page break function, then all those extra spaces or returns get in the way when it’s time to edit and remove pages or paragraphs. This is even more of a hassle when it comes to formatting your pages for book layout upon publication.
- Page Breaks: In Word, place the cursor at the end of a chapter, then click “Insert > Break > Page Break” in Word’s top menu.
9. Number the pages
Page numbers need to be on each page.
You don’t need to number the title page. Instead, you can start numbering on the page that beings your story.
The numbering of pages can be an automatic action in Word. You don’t need to hand number each page.
Page numbers should typically be placed at the top of each page. Note that other items such as TITLE and NAME OF AUTHOR on each page are useful, but not absolutely required. Page numbers are absolutely required.
- Page Numbers: To place page numbers in Word, double-click in the header area of the page and click “Insert > Page Numbers.”
10. Use a single space after periods
Manuscripts now require you to use only a single space after a period.
This is a point of some controversy because for many years typewriting students learned to type two spaces. That instruction existed because typewriters used monospaced type — that is, every character occupied an equal amount of horizontal space.
Monospaced type gives you text that looks uneven; white space exists between characters, so it’s difficult to spot the space after a period immediately. This is why we started using two spaces — on a typewriter, an extra space after a sentence makes text easier to read.
However, in the 1970s, monospaced fonts gradually disappeared from the scene. Electric typewriters and then computers started using proportional fonts. Today almost every font is proportional. (Courier is the one major exception.) Now that we’ve all switched to proportional fonts, adding two spaces after a period no longer enhances readability.
Today, every major style guide — including the Modern Language Association Style Manual and the Chicago Manual of Style — mandates a single space after a period.
So use a single space when you format your book. Please.
➤ How Word Counts Help Writers and Publishers: A Guide for Every Genre
These are basic requirements that you should keep in mind when you format your book. It’s easiest if you keep these guidelines in mind from the very first day you start work on your book, so that when it comes time to submit, you are easily able to output the required writing sample or the entire book.
If you use the correct template at the beginning of the process, you can save yourself, your agent and your editor much time and frustration.
Read more notes on writing:
➤ The Big List of 152+ metaphor examples for writers
➤ Literary Devices and Terms: 52+ Examples
➤ A Word Count Guide for Every Book Genre: Fiction & Nonfiction
➤ How Many Words Do Famous Writers write Every Day?
➤ How to Deliver a Book to an Editor: How To Format Your Manuscript
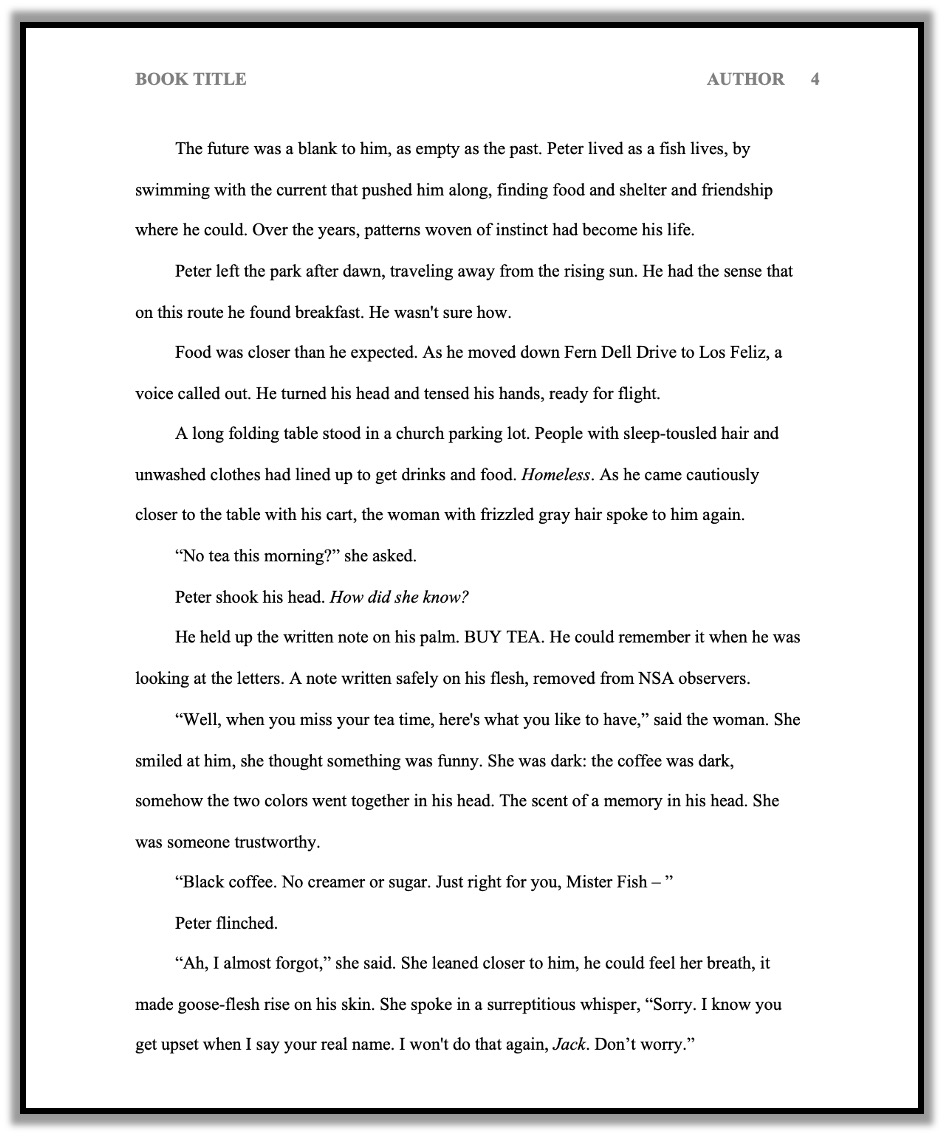
Here’s an example of a manuscript page in the correct book format.